Thursday, February 4, 2016

How to drywall a ceiling


Now that I am a homeowner, I need to leave the boosted ego aside and start improving my home with diy projects. I am no expert when it comes to remodeling, but I know a few tricks due to my experience and to the articles I have read online.


How to drywall a ceiling

I have learned lots of tips on drywalling a ceiling by reading several tutorials on the net. How ever, I especially loved Howtofixaholeindrywall.com, as it featured professional tutorials which are totally free. And who can say NO to something that comes at no cost? Especially when we speak about valuable knowledge that comes directly from professionals.


Mudding drywall ceiling 


Ask a friend to assist you when hanging the drywall sheets to the metal stud framing. Align all the sheets with attention and secure them to the frame with 1 1/4" screws. Place the screws every 8" for a professional result.

Apply fiberglass mesh to the seam before mudding the surface. Use a 6" drywall knife to spread the mud evenly. This must be one of the most versatile tools you can have, so make sure you buy one. I have seen good deals on amazon, so with as little as 10 dollars you can have the right tools for the job.

Let the first coat of mud to dry out overnight before applying the second coat. After it dries out you need to smooth the surface with sandpaper. Last but not least apply the third and final coat of drywall mud. Mix the joint compound with a little water, so you can work with it easier.


Tuesday, September 1, 2015

Small Gable Shed Plans


Building a small storage shed for your garden is a great idea, if you want to improve the storing of your tools and outdoor furniture. Make sure you select the right design for your shed before starting the actual construction, as to prevent costly mistakes and to save time.

Before starting the actual construction of the shed, you need to make sure that your project follow the local building codes. Therefore, you might need to get a building permit before starting the construction of the backyard shed.


Take a look over the above video, if you want to learn more about building a simple but sturdy shed. the video takes you over all the steps required to build a garden storage shed. Invest in high quality lumber and adjust the size and the design of the shed to suit your needs.

Add hinges to the door and a latch, in order to lock it properly. If you want to really enhance the look of the shed, we recommend you to fit a window to one of the sides of the shed, or even to the front wall. The window will let enough light to get inside the shed, so you can even use it as a workshop.

Make sure the surface is perfectly level and remove the vegetation layer before building the shed. If you want to can lay a 2" layer of compacted gravel, to distribute the weight of the shed properly. Add 4x4 skids under the frame of the shed, to create a clearance space between the fame and the ground.

Monday, February 9, 2015

How to build a gazebo


If you really want to build an amazing addition to your backyard, we recommend you to pay attention to the following instructions, as you are about to witness a brilliant idea for any house owner. If you consider a basic free standing pergola too blunt for your desired, a gazebo might be exactly what you are looking for to add character to your property.


Gazebo plans free

However, before starting the actual construction of your outdoor gazebo, we recommend you to take into account a few preliminary steps that will make all the difference between a failed project and an amazing one. Therefore, go to the local town hall to get accustomed with the local building codes. Taking into account that this is a permanent construction, chances are you need a building permit. However, look at the full half of the glass, as the requirements will help you design the ideal gazebo that will last for many years in a row.


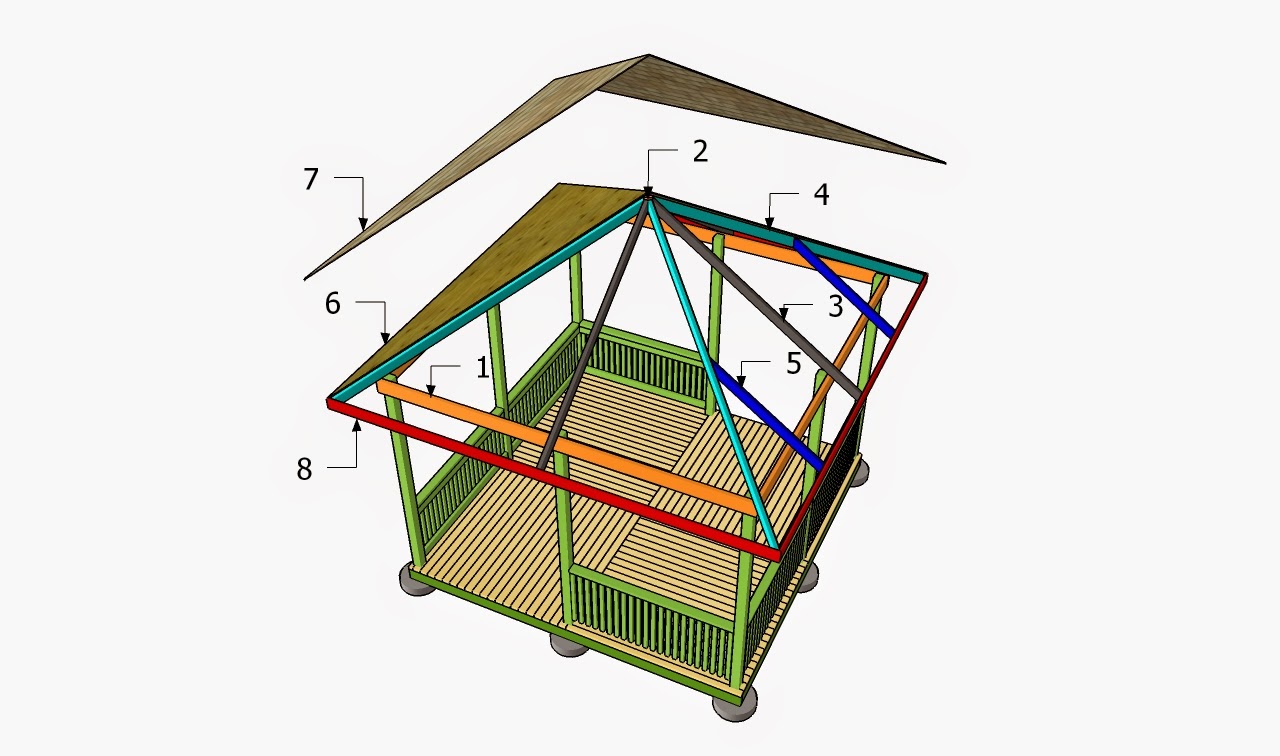
As you can easily notice in the diagram, you need to start the building project by assembling the floor frame. You need to set the posts in concrete, as to add support to the whole construction. Plumb the posts with a  spirit level before setting them in concrete and use temporarily braces until the concrete dries out. Next, fit the joists to the gazebo and the decking board. You need to align everything with attention, otherwise the end result won't raise up to your expectations.


Building the roof of the for the square gazebo is another story, as it requires a great deal of craftsmanship. There are many angle cuts you need to make when assembling the gazebo roof, so make sure you ask a skilled friend to assist you while getting the job done.

Fit the rafters to the structure and lock them tightly into place using galvanized screws. Drill pilot holes through the components before inserting the screws, to prevent the wood from splitting. Adjust the slope of the roof to suit your needs and tastes. Cover the structure with 3/4" plywood sheets. Afterwards, install tar paper and asphalt shingles.


SEE HERE how to build a gazebo, step by step, using detailed diagrams and through instructions.


How to build a gazebo


You should watch these videos, as they show you exactly what building a wooden gazebo takes. As you can easily notice in the videos, you can choose to build either a square gazebo or a rectangular gazebo, according to your needs and tastes. Irrespective of your choice, just make sure you plan everything from the very beginning.


As you can easily notice in this article, a gazebo doesn't have to remain an unattainable dream, but it can really become an amazing reality in just a few weeks. However, if you don't have the right woodworking skills for the job, we recommend you to hire a team of professionals. The costs will be higher, but at least you have the guarantee of a professional result and prevent injuries.

Thursday, August 15, 2013

Patio pergola plans

A wooden pergola is interesting and functional addition to any property. If you want to create a nice and basic shaded area in your garden, we recommend you to pay attention to the following information.

In most of the cases a patio pergola requires a building permit, so make sure you read all the building codes before starting the backyard project. There are so many plans to choose from, that we really recommend you to study several alternatives before choosing the final instructions. Don't be afraid to modify the design of the pergola, in order to ensure a better transition from the look of your garden to the design of the patio pergola.

In order to get the job done in a professional manner, we recommend you to work with attention and to use quality tools.

Don't forget to set the posts into concrete, especially if you live in a area with strong winds. Plumb the posts with spirit level before locking them into place.

Always pre-drill the lumber before inserting the screws into place, in order to prevent the wood from splitting. Align the components at both ends and add waterproof glue if necessary. The glue will most likely enhance the bond of the components and the rigidity of the structure.


As you can easily notice in the video, you have to lay out the pergola in a professional manner and to lock the components together tightly. Invest in high quality materials if you want to build a durable pergola. Ask a friend who is aware of the main woodworking techniques to give you a hand with the wooden construction.

Don't forget to check out the rest of our projects, if you want to learn more about how to build pergolas and gazebos. The more space you let between the rafters the more light will get through to your patio.

Saturday, April 13, 2013

Building a gazebo

Any wooden gazebo is a wonderful addition to garden, taking into account it increases the living space and it creates a great place to spend the summer afternoons with your family and friends. Generally speaking, gazebos come in many sizes and designs, starting with a basic square shape up to complex hexagons and octagons.

If you want to keep expenditures under control and still obtain a great result, follow our tips and tricks. Firstly, you should obtain a building permit (some regions require a building permit, while others ask it just for gazebos over a certain size). Nevertheless, we recommend you to always contact your local building codes before starting the project, to comply with the legal regulations.


Choosing the gazebo plans

An outdoor garden gazebo is one of the best choice for relaxing and leisure purposes, taking into account its advantages and the way it complements your garden and house. Moreover, if you choose to undertake the construction process by yourself, you can keep the total expenditures under control and still obtain a professional result.Nevertheless, you should plan the gazebo designs, location, shape and size, from the very beginning, as a proper preparation will save you from common problems. Make sure you emphasize on the planing stage, as the gazebo should reflect your personality and fit perfectly with the rest of your house and garden.

If you have the opportunity, it would be better to talk to people that have built a gazebo recently, as there are many things you could learn from their experience. There are many things can go wrong, therefore it is always a good thing to prevent the issues, as much possible, from the incipient stages.

You should consider adding a cooking area to your gazebo, like a barbeque, several outdoor cabinets and stainless steel appliances, especially if you are a fan of barbecues. If you really enjoy making barbeques quite often, you should also invest in a small sink near the cooking area, otherwise you would have to make many trips to your kitchen.


Building a gazebo
The gazebo designs, shapes and sizes vary a lot, therefore it is a true challenge to plan the ideal gazebo, from the first attempt. That is why, you should draw several sketches, until you find the shape that best satisfies your needs and budget. Read many specialized books, magazines or search on the internet different models. In addition, if you see a gazebo you like in your neighborhood, you shouldn't be afraid to ask the owners various questions. In most of the cases, they would help you and share their experience with you, pointing out the main obstacles and the issues that have hardened their work. Take notes and make a few pictures, to help you when designing the wooden gazebo.

On the other hand, technically speaking, the gazebos, even different in design and shape, share many things: the posts are installed in the same manner, the floor frame is built similarly, as well as the railings and balusters. In the case of octagonal gazebos, building the roof is more complex, as you have to install many rafters. Moreover, taking into account its shape, you should work with great care and attention, making sure the components are aligned and locked into position properly.


Ways to build a gazebo
On one hand, you can get the job done by yourself, if you have the right tools, enough time and master the basic carpentry techniques. On the other hand, you could also hire a contractor specialized in this field, or you could buy a gazebo kit..

If you hire a team of qualified builders, the total costs would be higher, but at least you have the guarantee of a well done job. Nevertheless, if you buy a professional gazebo kit, you could also assemble it by yourself in just one weekend, as it comes with pre-cut parts and step by step instructions.


More Projects:


How to Build a Gazebo 


Saturday, March 23, 2013

Free pavilion plans

If you want a nice shaded area in your garden, but a gazebo isn't exactly what you are looking for, we recommend you to consider making a wooden pavilion. In this project, we will show you how to choose proper free pavilion plans for your needs and how to keep the costs under control.

A wooden pavilion can take almost any shape, but the most common are the rectangular ones. In addition, we recommend you to align all the components at both ends and to pre-drill them before inserting the screws. The open structure will add value to your garden and liven-up all your weekends.

Always choose the right outdoor pavilion plans for your needs, before starting the actual construction. This is a real challenge for most of us, as we all know how hard is to choose from many options, in terms of designs and shapes. Nevertheless, you should make a short list, by excluding the alternatives that exceed your budget. Strange as it might seem, building a garden pavilion is expensive, especially if you invest in quality materials and you add many features.

Plan every aspect of the woodworking project form the very beginning, making sure you adjust the plans to your needs.

Dig deep holes in the ground and set the posts into concrete. Plumb the posts with a spirit level and secure them with braces, before building the roof of the pavilion.

If you want to create something unique and exquisite, we recommend you to build a small barbeque and a wooden bar. Although these features will increase the total costs of the project, we recommend you to consider what benefits they will bring to your woodworking project for you family and friends. A proper planning will mean less time and lower expenses for yoru project, so focus on all the preliminary stages of the project.


Resources:

http://myoutdoorplans.com/pergola/outdoor-pavilion-plans/


Thursday, February 14, 2013

Free Garden Arbor Plans

Garden Arbor Plans


If you want to create a charming place in your garden but you don't want to invest a high amount of money in the venture, we recommend you to build a simple garden arbor. We have a rich experience in these kind of garden projects, so we will share a few tips with you, as to prevent mistakes and to get a professional result.

First of all, we recommend you to study all the shapes and designs, before choosing the garden arbor plans. If you don't have a large expertise in the woodworking field, we recommend you to start with a small scale project. Use 2x2 lumber to build the legs of the of the arbor and attach 2x2 trims to both sides of the construction. In addition, if you want to add style to your arbor, you should attach 2x6 lumber to the top. Drill pilot holes trough the shade elements and fit them to the support beams with galvanized screws.

Grape Arbor

Alternatively, if you want to create a privacy screen or you like climbing plans, you could choose proper grape arbor plans. These constructions are similar in many ways, but you just need to adjust their design as to fit your needs and tastes. While the construction techniques are the same in all these garden projects, you need to use your creativity to create something unique that will fit the style of your house.

Last but not least, we cannot emphasize enough on the importance of securing the posts into place tightly. There are several alternatives that you could choose from. On one end, you could dig 2' deep holes and set the posts into concrete. This will provide a lot of support to your construction, but you won't be able to move it to another location. Alternatively, you could pour concrete footings and use metal anchors.

Free Garden Arbor - VIDEO


Resources:


Garden Arbor Plans Free